jupyter-lab多环境安装

By | September 11, 2022

当你同时需要python 3.7和3.8版本,或者库依赖出现冲突的时候,可以通过conda的env安装多个环境,但这个时候怎么在jupyter中选择不同的环境呢?

简单的做法是每个环境各装一个jupyterlab,但使用的时候切来切去非常难受。

既然jupyter有kernel机制,我们就来稍微研究一下吧。

环境信息

假设你已经装好了conda,通过

1
conda info

命令查看环境信息,主要是得到active env location,后面会用到。

<code class="language-bash">active environment : base
active env location : /opt/homebrew/Caskroom/miniforge/base</code>

安装jupyterlab

我们只在base环境安装jupyterlab,使用命令

1
pip install jupyterlab

<code class="language-bash">...
Successfully installed jupyterlab-3.4.6 ...</code>

键入

1
jupyter-lab

命令即可启动,这时候会在浏览器自动打开http://localhost:8888/lab

这时只有一个Python 3的图标,对应的是base环境的python 3.9

安装 python 3.8

<code class="language-bash"># 创建一个独立的py38环境
conda create -n py38 python=3.8
# 激活这个环境
conda activate py38
# 安装必须的包
pip install ipykernel</code>

这jupyter中加入 python 3.8

进入jupyter的kernels目录:

<code class="language-bash">cd /opt/homebrew/Caskroom/miniforge/base #刚刚获取的active env location路径
cd share/jupyter/kernels</code>

通过

1
ls

命令看看,只有一个python3

现在我们复制一下这个文件夹,叫做python3.8吧

<code class="language-bash">cp -r python3 python3.8
cd python3.8
touch env.sh
chmod +x env.sh</code>

编辑env.sh文件,内容如下,注意,conda activate后面就是你想要激活的环境

<code class="language-bash">#! /bin/sh

if [ -f ~/.zshrc ]; then
    source ~/.zshrc
fi
if [ -f ~/.bashrc ]; then
    source ~/.bashrc
fi
conda activate py38
python $@</code>

编辑kernel.json文件,把它改成这样,注意第3行的env.sh文件需要绝对路径,根据你的实际情况填写:

<code class="language-json">{
 "argv": [
  "/opt/homebrew/Caskroom/miniforge/base/share/jupyter/kernels/python3.8/env.sh",
  "-m",
  "ipykernel_launcher",
  "-f",
  "{connection_file}"
 ],
 "display_name": "Python 3.8",
 "language": "python",
 "metadata": {
  "debugger": true
 }
}</code>

刷新一下浏览器页面,就能看到我们添加的环境了

验证一下是否正确,新建一个使用Python 3.8的notebook,通过感叹号执行sh命令,看看python版本和pip包,如果都符合预期,就OK了

树莓派开启Wi-Fi热点

By | January 22, 2022

如果你需要在外场通过Wi-Fi连接树莓派,但又没有路由器的Wi-Fi信号,这种情况可以把树莓派配置成AP,发射一个Wi-Fi热点。

注意:本文不涉及通过Wi-Fi热点上网

1.安装依赖包

1
2
3
sudo apt-get update
sudo apt-get install hostapd
sudo apt-get install dnsmasq

2.配置DHCP服务器dnsmasq,自动分配地址

1
2
3
4
sudo bash -c 'cat >> /etc/dnsmasq.conf' << EOF
interface=wlan0
  dhcp-range=192.168.80.11,192.168.80.30,255.255.255.0,24h
EOF

3.配置hostapd,注意下面按照需要修改ssid和password

1
2
3
4
5
6
7
8
9
10
11
12
13
14
15
16
17
18
19
20
21
22
23
24
25
26
27
28
sudo bash -c 'cat > /etc/hostapd/hostapd.conf' << EOF
interface=wlan0
hw_mode=a
ieee80211d=1
ieee80211n=1
ieee80211ac=1 # 802.11ac support
ht_capab=[HT40+][SHORT-GI-20][SHORT-GI-40][DSSS_CCK-40]
require_ht=1
basic_rates=60 90 120 180 240 360 480 540
vht_capab=[MAX-MPDU-3895][SHORT-GI-80][SU-BEAMFORMEE]
country_code=CN
channel=149
wmm_enabled=1
macaddr_acl=0

auth_algs=1
ignore_broadcast_ssid=0
wpa=2
wpa_key_mgmt=WPA-PSK
wpa_pairwise=TKIP
rsn_pairwise=CCMP
ssid=raspberry
wpa_passphrase=password
EOF


sudo bash -c 'cat > /etc/default/hostapd' << EOF
DAEMON_CONF="/etc/hostapd/hostapd.conf"
EOF

4.开启AP
由于wpa_supplicant是由dhcpcd管理,并不是单独的service,所以配置nohook即可

1
2
3
4
5
6
7
8
9
10
11
12
13
14
#配置wlan0静态地址
sudo bash -c 'cat >> /etc/dhcpcd.conf' << EOF
interface wlan0 #config-ap
static ip_address=192.168.80.1/24 #config-ap
nohook wpa_supplicant #config-ap
EOF


sudo systemctl restart dhcpcd

sudo systemctl enable hostapd
sudo systemctl enable dnsmasq

sudo systemctl restart hostapd
sudo systemctl restart dnsmasq

好了,现在应该可以搜索到一个叫raspberry的Wi-Fi信号了,树莓派的IP地址是:192.168.80.1

5.关闭AP(如果需要还原到连接路由器)

1
2
3
4
5
6
7
8
9
10
#删除wlan0静态地址
sudo sed -i '/#config-ap/d' /etc/dhcpcd.conf

sudo systemctl stop hostapd
sudo systemctl stop dnsmasq

sudo systemctl disable hostapd
sudo systemctl disable dnsmasq

sudo systemctl restart dhcpcd

训练一个跑在嵌入式环境的YOLOv4模型检测人,猫,狗

By | May 31, 2020

2020年4月,Alexey Bochkovskiy在他的Github放出了YOLO检测模型的第四个版本:YOLOv4,比YOLOv3计算量变化不大的前提下,大幅提升了算法效果,在MS COCO数据集上mAP@0.5从33%提升到43.5%。

官方提供训练好的权重文件大小为246MB,提供了80类物体的检测,在PC上通过CPU运行608x608尺寸推理的耗时则达到了2秒多,要在嵌入式环境运行完全无法达到实时性能要求。如果我们只关心某几类物体,能否进行一些优化呢?

我挑选了三类目标:人、猫、狗进行实验。在MS COCO 2017数据集上训练一个可以在VisionSeed(1T FP16算力)上实时运行的YOLOv4-nano模型。

MS COCO 2017包含80类不同的目标框标注,训练集和验证集图片数量如下:

1
2
3
4
5
6
+-------+--------+--------+------+------+-----+
|       |  all   | person | cat  | dog  | ... |
+-------+--------+--------+------+------+-----+
| train | 118287 |  64115 | 4114 | 4385 | ... |
| val   |   5000 |   2693 |  184 |  177 | ... |
+-------+--------+--------+------+------+-----+

可以看到其中包含“人”这一类的图片占到了训练集的一半,因此训练时间估计不会降低太多。

我们再来看看目标硬件平台:VisionSeed,这是一个我在腾讯优图主导推出的,内置了NPU的摄像头模组,售价499,NPU中有专门执行卷积、Maxpool、ReLU的加速单元,因此包含这三类运算比例高的模型能得到最大程度的提速。原版的YOLOv4模型存在NPU不支持的MISH激活函数,把所有激活函数换回硬件支持的ReLU重新训练后,又适配了AnchorInit、候选框生成、NMS等后处理算法,我在VisionSeed上成功跑通了全尺寸的YOLOv4,以512x288的输入分辨率进行推理耗时是464ms,双核跑满能跑到4fps。

进一步优化,我想到了MobileNet提出的一个机制:按比例缩减每一层的channel数量,MobileNet提出了一个alpha值,分别有0.25、0.5、0.75和1.0,例如MobileNet-0.25就是将channel数量缩减到原来的1/4,推理速度提升约4倍,模型大小则降低了16倍!

在此提出YOLOv4-nano系列,相对原版进行了两方面改动:将所有的激活函数换成ReLU以便于NPU加速;对骨干网络的channel数进行按比例缩减。与YOLOv3的tiny系列不同,nano保留了骨干网络的各级残差结构,网络深度不变。并且channel缩减系数比较灵活,对于算力更弱的平台,甚至可以尝试YOLOv4-nano-0.125

经过实验,YOLOv4-nano系列在VisionSeed模组上的单帧耗时如下(512x288)

1
2
3
4
5
6
7
+--------------+--------+------------------+-----------------+-----------------+
|  VisionSeed  | YOLOv4 | YOLOv4-nano-0.25 | YOLOv4-nano-0.5 | YOLOv4-nano-1.0 |
+--------------+--------+------------------+-----------------+-----------------+
| time         |      - |            0.114 |           0.211 |           0.464 |
| FPS(2-cores) |      - |               15 |               8 |               4 |
| size(fp16)   |  123MB |            7.6MB |            31MB |           123MB |
+--------------+--------+------------------+-----------------+-----------------+

替换激活函数、缩减channel数量对算法指标有多大影响呢?经过实验,我训练的人猫狗三类目标检测模型所有激活函数替换为ReLU后mAP@0.5从0.83降低到0.82,还算可以接受,最快的YOLOv4-nano-0.25 mAP进一步降低到0.74,相对原版降低9个百分点,但速度有了4倍的提升。YOLOv4-nano系列在MS COCO 2017上只检测人、猫、狗三类的mAP详细指标如下:

1
2
3
4
5
6
7
8
9
+------------+--------+------------------+-----------------+-----------------+
|  mAP@0.5   | YOLOv4 | YOLOv4-nano-0.25 | YOLOv4-nano-0.5 | YOLOv4-nano-1.0 |
+------------+--------+------------------+-----------------+-----------------+
| all        |   0.83 |             0.74 |            0.78 |            0.82 |
+------------+--------+------------------+-----------------+-----------------+
| person     |   0.76 |             0.67 |            0.73 |            0.75 |
| cat        |   0.91 |             0.84 |            0.84 |            0.90 |
| dog        |   0.81 |             0.70 |            0.75 |            0.80 |
+------------+--------+------------------+-----------------+-----------------+

训练过程loss和mAP@0.5变化曲线:
YOLOv4 detects person, cat and dogYOLOv4-nano025 detects person, cat and dog

左图:YOLOv4训练曲线 右图:YOLOv4-nano025训练曲线

找一个连续运动视频看看效果:

如果你也想训练自己感兴趣目标的检测器放到这个小模组中运行,那就开始动手吧。在上一篇文章中,配置好了Ubuntu 18.04 CUDA 10.0的编译运行环境,为编译最新的Darknet铺平了道路。

我把本文描述的所有更改,以Makefile/bash脚本的形式开源到https://github.com/liangchen-harold/yolo4-nano.git(欢迎加星),按照如下方式可开箱即用:

1
2
3
4
5
6
7
8
9
10
11
12
13
14
15
16
17
18
19
20
21
22
23
24
25
26
27
28
29
30
31
32
33
34
35
36
# 安装依赖
sudo apt install libopencv-dev

# 下载我github上的YOLOv4-nano轻量级脚本,对原版配置文件自动修改
git clone https://github.com/liangchen-harold/yolo4-nano.git
cd yolo4-nano
make install

# 下载MS COCO 2017数据集,解压缩到datasets/coco2017中,文件夹结构如:
datasets/
└── coco2017/
├── annotations/
│   ├── instances_train2017.json
│   └── instances_val2017.json
└── images/
├── train2017/
│   ├── 000000000139.jpg
│   └── ...
└── val2017/
├── 000000000009.jpg
└── ...

# 编辑Makefile
# 1.选择你需要的类别,替换第5行默认的CLS=cat dog
# 2.如果需要尝试不同的大小,调整第13行的NANO=0.25
# 更改过CLS后,一定要运行:
make data

# 开始训练
make train

# 训练完成后,可以输出详细AP信息
make validation

# 也可以放一个test.mp4文件后执行
make inference

如果你有训练好的模型,希望放到VisionSeed中运行,可以留言附上make validation获取的AP信息,获取内测资格哦~

Category: AI

在Ubuntu 18.04上安装深度学习训练环境

By | May 5, 2020

0x00:前传
去年底又入了一台DELL,这次是因为需要GPU训模型,正好Nvidia出了基于Turing核心的GTX-1660Ti用于笔记本,比2060少了Tensor Core,但显存一样是6G,想想Tensor Core的意义在于FP16加速训练,但半精度训练配置比较繁琐,暂时不折腾也罢,于是6799入了这台Dell-G3-3590游戏本,被我装上Ubuntu训模型,训练速度比CPU快了20~30倍,大概有V100单卡的50%,而价格只及V100的1/10,非常适合用来学习。

第一次折腾CUDA,实现了CUDA9和CUDA10共存,能同时支持下面两个环境,把安装过程记录一下。
tensorflow-gpu 1.9:CUDA9 + cuDNN 7.0
darknet:CUDA10 + cuDNN 7.5

0x01:理论
CUDA分为两个部分,内核态的驱动(.ko)和用户态的动态链接库(.so)。CUDA的内核态驱动是高版本兼容低版本。而一般说的CUDA9或者CUDA10是指用户态动态链接库的版本,跨版本不兼容,因此,理论上只需要安装一个高版本的内核态驱动,然后通过将CUDA的用户态库安装到不同目录中来达到多版本共存目的。

内核态的驱动版本号一般是3xx.mm或4xx.mm,例如,现在最新的是440.64,在Ubuntu下,由nvidia-driver-4xx和它的依赖包提供。

用户态的动态链接库,其实是一系列的功能库组成的集合,例如cudart, cublas, curand, cufft等,由cuda-libraries-10-0和它的依赖包提供。

还有一个部分,是CUDA内核函数编译器(此内核并非操作系统内核,应该是源于filer的kernel概念,这里指运行在GPU中的算子),由cuda-compiler-10-0和它的依赖包提供。如果需要运行自定义的CUDA kernel函数,就需要安装这个包,例如编译darknet就需要它。

0x02:现状
Ubuntu有两个源提供CUDA驱动和库,一个是Ubuntu的官方源,另一个是Nvidia提供的源。Nvidia源比较新,并且提供了CUDA各个版本共存的机制,所以经过一番尝试后,最终选择了Nvidia源。

0x03:安装CUDA内核态的驱动和CUDA10
在新立得包管理器(synaptic)中,打开“设置”->“软件库”->“其他软件”,点击“添加”,分别添加下面两个Nvidia源,然后关闭并自动刷新:

1
2
deb http://developer.download.nvidia.com/compute/machine-learning/repos/ubuntu1804/x86_64 /
deb http://developer.download.nvidia.com/compute/cuda/repos/ubuntu1804/x86_64 /

如果是手动编辑/etc/apt/source.list并遇到如下错误:

1
W: GPG error: https://developer.download.nvidia.cn/compute/machine-learning/repos/ubuntu1804/x86_64  Release: The following signatures couldn't be verified because the public key is not available: NO_PUBKEY F60F4B3D7FA2AF80

可通过命令自动添加证书:

1
sudo apt-key adv --keyserver keyserver.ubuntu.com --recv-keys F60F4B3D7FA2AF80

搜索cuda,找到下面两个包,分别点击右键选“标记安装”,将会自动标记所需依赖。

1
2
3
cuda-runtime-10-0
cuda-libraries-dev-10-0
cuda-compiler-10-0

点击“应用”,然后大概需要下载1G的内容,安装后占据2G空间。安装完后,在终端中运行nvidia-smi检查是否成功。如果提示未找到设备,可以尝试自己载入内核态驱动:

1
sudo modprobe nvidia-uvm

如果成功,将会显示如下的内容

1
2
3
4
5
6
7
8
9
10
11
12
13
14
15
16
Tue May  5 15:21:43 2020      
+-----------------------------------------------------------------------------+
| NVIDIA-SMI 440.82       Driver Version: 440.82       CUDA Version: 10.2     |
|-------------------------------+----------------------+----------------------+
| GPU  Name        Persistence-M| Bus-Id        Disp.A | Volatile Uncorr. ECC |
| Fan  Temp  Perf  Pwr:Usage/Cap|         Memory-Usage | GPU-Util  Compute M. |
|===============================+======================+======================|
|   0  GeForce GTX 166...  Off  | 00000000:01:00.0 Off |                  N/A |
| N/A   64C    P0     0W /  N/A |      0MiB /  5944MiB |      0%      Default |
+-------------------------------+----------------------+----------------------+
                                                                               
+-----------------------------------------------------------------------------+
| Processes:                                                       GPU Memory |
|  GPU       PID   Type   Process name                             Usage      |
|=============================================================================|
+-----------------------------------------------------------------------------+

0x04:安装CUDA9
在新立得包管理器(synaptic)中,打开“设置”->“软件库”->“其他软件”,点击“添加”,分别添加下面两个Nvidia源(注意,这里添加的是16.04的源,只有这个源中才有CUDA9!!!)

1
2
deb http://developer.download.nvidia.com/compute/machine-learning/repos/ubuntu1604/x86_64 /
deb http://developer.download.nvidia.com/compute/cuda/repos/ubuntu1604/x86_64 /

关闭并自动刷新后,搜索cuda-libraries-9-0,右键选“标记安装”,将会自动标记所需依赖。

好了,现在两个版本的用户态库分别安装到这两个位置了:

1
2
/usr/local/cuda-9.0
/usr/local/cuda-10.0

0x05:安装cuDNN
cuDNN是CUDA的深度学习支持库,但是,不知道为啥,这个跨版本不兼容的库,Nvidia使用了版本兼容的语义进行安装,这会导致只能二选一的问题。
什么是跨版本兼容的语义呢?首先,包名中只有大版本:libcudnn7,第二,程序编译时,指向了只包含大版本号的符号链:/usr/lib/x86_64-linux-gnu/libcudnn.so.7。
遇上这样的情况:TF1.9依赖cuDNN 7.0版,而如果Darknet依赖cuDNN 7.5,就懵了。

解决方案其实很简单:搞清楚具体是哪一个.so,然后在运行程序时,通过环境变量LD_LIBRARY_PATH来控制加载哪一个。

方式一(命令行):

1
2
3
4
5
6
# 安装cuDNN 7.0
sudo apt install libcudnn7-dev=7.0.5.15-1+cuda9.0 libcudnn7=7.0.5.15-1+cuda9.0
# 备份cuDNN 7.0
sudo mv /usr/lib/x86_64-linux-gnu/libcudnn.so.7* /usr/local/cuda-9.0/lib64/
# 安装cuDNN 7.5
sudo apt install libcudnn7-dev=7.5.1.10-1+cuda10.0 libcudnn7=7.5.1.10-1+cuda10.0

方式二(新立得包管理器):
安装cuDNN 7.0
在新立得包管理器(synaptic)中,搜索libcudnn7,选中结果后,点击菜单“软件包”->“强制版本”,选择“7.0.xxx+cuda9.0 (developer.download.nvidia.com)”,确定、应用后,查看libcudnn7右键属性中的“已安装文件”我们发现cuDNN提供的.so库只有这一个:/usr/lib/x86_64-linux-gnu/libcudnn.so.7.0.5,然后有一个/usr/lib/x86_64-linux-gnu/libcudnn.so.7符号链指向了它。
我们在终端中,把这个版本复制到一个目录中,因为后面装7.5版的时候会被覆盖:

1
sudo mv /usr/lib/x86_64-linux-gnu/libcudnn.so.7* /usr/local/cuda-9.0/lib64/

安装cuDNN 7.5
在新立得包管理器(synaptic)中,搜索libcudnn7,对结果中的libcudnn7和libcudnn7-dev分别操作:点击菜单“软件包”->“强制版本”,选择“7.5.xxx+cuda10.0 (developer.download.nvidia.com)”,确定、应用后,系统的cuDNN已经被覆盖为7.5版本了。

这里,我们用7.5版本作为默认安装,也就是说,不改变任何环境变量,默认加载的cuDNN是7.5版本。如果需要7.0版本,那么就通过在命令前增加赋值来启动:

1
LD_LIBRARY_PATH=/usr/local/cuda-9.0/lib64/:$LD_LIBRARY_PATH python3 train.py

0x06:清理
刚刚,为了安装CUDA9.0,我们添加了Ubuntu 16.04的Nvidia源,这个源中的CUDA10以及更新的包其实是不兼容Ubuntu 18.04的,为了以后不出现误操作,我们把这个源禁用掉:在新立得包管理器(synaptic)中,打开“设置”->“软件库”->“其他软件”,找到两个包含ubuntu1604的源,去掉前面的钩就行啦!

0x07:安装tensorflow, pytorch, darknet ...
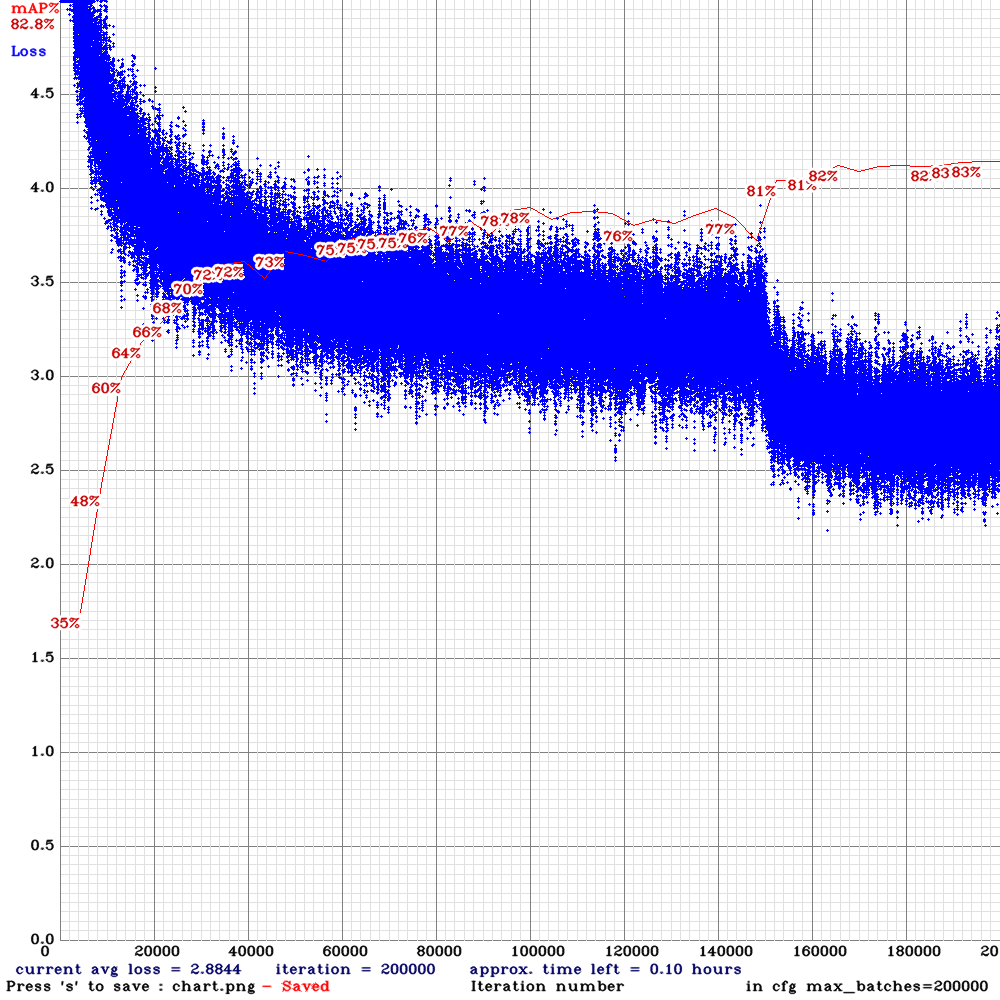
后一篇文章《训练一个跑在嵌入式环境的YOLOv4模型检测人,猫,狗》介绍了基于Darknet进行YOLOv4检测模型的训练,至于tensorflow、pytorch介绍的文章很多了,基本都是常规操作,就不多说了~

Category: AI

TensorFlow中Batch Normalization的两个大坑

By | October 5, 2019

尝试用Inception和MobileNet训练一个二分类模型,折腾了几天,发现MobileNet很难收敛,而Inception训练虽然收敛,但测试时结果却很糟糕。
最后排查下来,只要在测试时把is_training设为True,看起来就正常了,但只要is_training是False,结果就不对。

很容易就排查到了一个问题,从零构建的代码使用如下的方式创建优化器(实际上是错误的):

1
    self.train_step = tf.train.GradientDescentOptimizer(learning_rate).minimize(self.loss, global_step=self.global_steps)

Inception和MobileNet使用的Batch Normalization层需要在训练时统计mini batch的均值和方差并进行滑动更新;在推理时是不进行统计和更新的,而是使用训练时统计好的值。这就要求训练时要进行额外的操作,正确的写法是这样:

1
2
3
    extra_update_ops = tf.get_collection(tf.GraphKeys.UPDATE_OPS)
    with tf.control_dependencies(extra_update_ops):
        self.train_step = tf.train.GradientDescentOptimizer(learning_rate).minimize(self.loss, global_step=self.global_steps)

让人意外的是,改正了这个问题后,测试不收敛的问题还是一直萦绕着,虽然多个链接都说按照上面修改后,is_training为False就没问题了[1] [2],但我面临的情况并非如此。
现在的现象仍然是:训练逐渐趋于收敛(accuracy > 0.99),但测试时却是非常奇怪的结果(accuracy 约等于 0.5),而且对任何输入图片,都输出固定的结果,比如[0.503, 0.497]

mobilenet-experiment-6k-train-lr0.001-do0.99-crop
左图:训练收敛 右图:测试不收敛

在slim.mobilenet源码中,is_training只出现了4次,除影响bn层外,还影响了dropout层,通过对照实验很快排除了dropout层,问题锁定在了bn层。bn层有很多参数,其中一个decay参数是控制统计滑动平均的保留率,在mobilenet和inception的实现中,对应于batch_norm_decay,它的默认值为0.9997,逼近速度非常慢,如果我们训练集很小,训练次数也只很少(几千次)的话,均值和方差几乎没有得到更新!奇怪的是,只有很少的文章提到了这个问题[3]

1
2
    with slim.arg_scope(mobilenet_v1.mobilenet_v1_arg_scope(batch_norm_decay=0.95)):
        self.prediction, ep = mobilenet_v1.mobilenet_v1(xs_reshaped, num_class, dropout_keep_prob=self.keep_prob, is_training=self.is_trainning, depth_multiplier=1)

将batch_norm_decay设为0.95后,再训练几百次,测试集终于开始有动静了!

Category: AI

在Ubuntu上使用macOS的快捷键

By | January 27, 2018

因为常用机一台Mac,一台Linux,都频繁使用,两个系统不同的快捷键已经让人精神分裂了!

macOS几乎所有的快捷键都基于command键,全选(cmd+a)、复制(cmd+c)、粘贴(cmd+v)、开关标签页(cmd+t/w)、切换窗口(cmd+tab)、保存(cmd+s)、撤销(cmd+z)、重做(cmd+shift+z)、查找(cmd+f)

而Linux几乎沿用了Windows的习惯,混合使用ctrl和alt,现在甚至fn都用上了(fn+left=home, fn+right=end),忽然感慨macOS设计的优美,频繁使用的快捷键都是加cmd,不用考虑到底是按alt, ctrl还是fn。

终于找到两个神器——gnome-tweak-tool和AutoKey,可以重新映射全局快捷键

1
2
apt-get install autokey-gtk
sudo apt-get install gnome-tweak-tool

基本思路是:把alt和ctrl对调,用键位和cmd类似的alt来实现macOS上cmd的功能,再逐一解决各种小问题:

Screenshot from 2018-07-25 23-36-46

通过AutoKey实现home、end等功能:

Screenshot from 2018-07-25 23-37-46

设置窗口切换快捷键(Ubuntu 16.04):
Screenshot from 2018-07-25 23-38-46

设置窗口切换快捷键(Ubuntu 18.04):系统设置->设备->键盘->切换应用程序:Ctrl-Tab
2019-12-13 21-57-56 的屏幕截图

done!

2017年的新电脑(Dell Vostro 5370)上安装Ubuntu 16.04

By | December 16, 2017

我只是想要一台轻便、稳定、好用的Linux笔记本,没想到却被PC行业的各种“新”设计折腾的半死……

改分区,为Linux腾空间
我一开始被BitLocker整懵了,Ubuntu的安装工具完全无力招架加密分区,后来发现Win10自己也可以改变分区大小,不需要任何第三方工具,就在磁盘管理里,对C盘右键,有“压缩”选项,这名字起的还真够歧义,但就是他了!因为开了BitLocker,压缩选项是灰的,关掉BitLocker就好了!这方面Win10做的还不错,可以动态关闭BitLocker,可以动态调整分区大小。

UEFI
一开始因为在Win10下面用Universal USB Installer 123制作的安装U盘,必须在BIOS里把UEFI和Securt Boot关掉才能引导,这样安装后也还是Legacy模式,和原来Win10的UEFI模式不能和谐共存,折腾疯了之后,才发现根本【不用关闭UEFI和Securt Boot】!正常情况下就应该能在UEFI启动设置那里看到Ubuntu的安装U盘,并顺利启动,如果没有看到,只有一个可能,就是安装U盘制作方式不对,目前试过的方法,只有把iso文件直接写入U盘的方式才可以,就是在一台Linux机器用dd命令写入:

1
2
sudo umount /dev/sdb
sudo dd if=ubuntu.iso of=/dev/sdb bs=1M(一定先确定好sdb是你的U盘哦,要不然你sdb的数据可就没了!)

Touchpad(ClickPad单按键全面板)
真的没有见过这么脑残的触摸板设计,手指放在按钮区域竟然会被识别成触摸!我习惯拇指一直搭在左键上,再用食指触摸当指针,可是这个触摸板这样操作是不行的,会被理解成双指操作,真的非常非常脑残!由于不是Synaptics的触摸板,没有找到软件解决方案,只能在左键上垫了一层东西,隔绝了触摸识别。然后问题又来了,由于触摸板只有一个实体按键,区分左右键是通过看按下去的时候手指的触摸区域来做到的,垫了一层东西后,没有识别到手指,触摸板就不知道到底是左键还是右键了,按下去没反应,折腾一晚上,才发现这个变通的方法:关闭ClickPad模式(唯一的实体按键直接当作左键处理,不做触摸区域识别,因此也就没有了实体右键,不过右键用的不多,双指轻触手势作右键也还凑合)

编辑配置文件:

1
sudo vi /usr/share/X11/xorg.conf.d/70-synaptics.conf

增加一节,增加Option "ClickPad" "0",以便允许没有触摸点击用作左键单击

1
2
3
4
5
6
7
8
Section "InputClass"
        Identifier "clickpad buttons"
        MatchDriver "synaptics"
        Option "ClickPad" "0"
        Option "VertScrollDelta" "10" #双指滚动速度
        Option "HorizScrollDelta" "10"
        Option "MaxTapMove" "10" #避免短距离双指滚动被识别成右键手势
EndSection

Hosts a HP printer on my WIFI router(OpenWRT)

By | April 21, 2014

Warning: this article may out of date, I found another way to setup a socket printer officially supported by OpenWRT: p910nd

Printing through network is very convenient since everyone in the office can share the printer. We have a strong WIFI router running OpenWRT, and I found that the CUPS system was included in the package manager. But I quickly noticed it was not an easy work. Lets write the progresses down.

First, install the cups, hplip through the package manager as follow:
QQ20140421-1

Second, ssh to the router and edit this file: /etc/hotplug.d/usb/20-hplip
Insert one line:

DEVICE=`echo $DEVICE | sed s/proc/dev/g`

And modify the $PRODUCT value to match your own printer

QQ20140421-3

If this configuration is not right, cups would have insufficient rights to write to the printer through USB device and would get an error: "prnt/backend/hp.c 745: ERROR: open device failed stat=12" in the system log.

P.S. If you got this error: "io/hpmud/musb.c 136: unable get_string_descriptor -1: Operation not permitted", it means the USB device corresponding to the printer had been opened by another process. In my case, it was opened by the kmod-usb-printer(general printer driver), so just uninstall it and the problem was solved.

Third, config CUPS through the web interface: http://192.168.10.1:631
QQ20140421-4
If all the things are right, you will see your printer here:
QQ20140421-5

After finishing the config through "Continues", all the setups on the server-side is done!

Next we should add network printer on the client side: Mac OS X/Linux/Windows.

Linux is the most hard part. I'm using a Debian Linux 7.0 as my Desktop, After a lot of search, I found that the CUPS server must be installed on the client Linux too! And the proper HP printer driver must be installed too!

Openprinting.org said the recommended deriver for my printer(HP-LaserJet Pro P1566) is foo2zjs-z2, and yes, its absolutely right! I installed two other HP derivers: hpcups(through hplip) and hpijs, both failed with status "/usr/lib/cups/filter/hpcups failed", and logged "printer-state-reasons=hplip.plugin-error".

TopCoder SRM 588 DIV 2 maxSongs

By | September 3, 2013

TopCoder SRM 588 DIV 2 500 maxSongs

Failed to pass system tests during the competition through simple greedy strategy. I thought it can be solved by DP, but had no clear way to go.

After the competition, I finally found out that the result must be a subset of the vector sorted by tone!

So, we can degrade the original arrangement problem (O(n!)) to a combination problem (O(2^n)), and then calculate through simple brute force since the number of elements is less than 16. ~_~

It has a DP solution here, I would study it later.

My degraded brute force solution source in C++:

Continue reading

Restart – step by step: Read/Write SDRAM via Verilog

By | October 14, 2012

5 years ago, I was trying to design a CCD camera for astrophotography in  my spare time. But since I was major in Software Development, I didn't know much about hardware design other than 8051 MCU. After 1 year with many failures on wrong directions, I just clarified I'd better use CPLD or FPGA with Verilog/VHDL for sequential logic circuit instead of using a MCU everywhere. It was a hard progress. I had a goal too huge, and was eager for the result.

By making some tiny CPLD projects those years, I had a better understanding on sequential/combinational logic design using Verilog. I made a general experiment board for one of the projects, it mounted a Altera CPLD EPM570T100 and a Cypress 68013A USB client controller with 51 core. So I thought I can continue the camera designing now.

Last time, I was stopped by the RAM size limitation which should store a whole frame data of the Image sensor before sending via USB bulk protocol. So we begin by a little step: adding an external SDRAM to the system.

SDRAM has much complex timing diagram than SRAM. It has 6 operation stages for a simple single read: Active a "row", Wait For the "tRCD", send Read Command with a "column", PRECHARGE(means "DeActive"), Wait for the "CAS Latency", Read data.

Continue reading